Do one thing everyday that scares you…Eleanor Roosevelt
Welcome everyone, Long post alert but it’s my first tutorial y’all! My name is Sola in case you are visiting for the first time via the blog hop, I do hope you enjoy looking around and find a reason to stick around! In other news, sadly (yes I did say sadly )I’m back to work today after my long holiday . It feels like yesterday when I was tracking my fabric delivery hoping it gets to me before I left for my holiday but guess what, they delivered it a day after! Anyway, 3 weeks later after lots of hiccup and dragging my husband out of bed at 6 a.m., I finally got the fabric. Wait…what fabric am I on about?
Well I’ve had exciting things happening since I took part in the 2016 New Quilt Blogger Blog Hop and somehow I took a leap of faith and signed up for this blog hop (the reason why you are here). The Blog Hop is sponsored by Cloud 9, and hosted by (Thank you Ladies! 🙂 )Yvonne of Quilting Jetgirl, Cheryl of Meadow Mist Designs and Stephanie of Late Night Quilter! I believe there are almost 70 bloggers creating new blocks using the fat quarter bundle of the oh so soft and oh so pretty organic Cirrus Solids generously provided by Cloud9 fabrics and the palette we got is called “Berry Harvest” how befitting and clever. Before I forget, Don’t miss out on the (3) separate fat bundle giveaways, visit the hosts for entry details! Another cool fact, all the new blocks are going to be pieced together to make a charity Quilt.
I have to say I am so impressed with how quick the delivery came through even though I missed it. When I signed up for the hop albeit at the last minute, I just wanted to sign up for the sake of it, I didn’t have any plans. A part of me wasn’t even expecting to get the fabric, like why will they bother sending a fabric sample all the way to Nigeria, but hey the fabric came through, I fell in love with it and the challenge was to create a block that well showcases the beauty of this palette and fabric. I initially thought , I have never designed a block on my own and now to not only design one but write a tutorial that makes sense, lets just say that was my one thing a day that scares me (see the quote by Eleanor Roosevelt above).
I was going to play it safe and create a modified version of the Cross Block and even have a written tutorial for that to be shared later. However, I have been spending some time with English Paper Piecing and my block which I finally decided to call “Diamond Fusion” (you don’t want to hear about the hustle of naming this block but my friend came to the rescue) was born and it features all 5 colors in this palette. The name is simply a reflection of the block elements.


Now let me introduce you to Diamond Fusion and I hope you love it as much as I do!

Can I just say a big thank you to Amanda @thismomquilts who graciously offered to help with my illustrations, she did an amazing job and even partially tested my block :). This has been such a huge learning curve, I did learn among other things how to design my block on Microsoft Word following one of the tutorials shared by the host but nothing as professional as Amanda’s Illustrations.And now for the tutorial, I have taken so many step by step pictures for this tutorial but besides the fact that my photography skills leaves a lot to be desired, I totally ran out of time to edit all the pictures but not to worry, I created an illustrated PDF version that is way easier to follow which you can download via this link diamond-fusion-block-tutorial (It works I’ve tried it 🙂 ) But if it fails kindly lemme know and as a backup, here is the not so watered down version of the tutorial. By the way, if you go with the PDF version, then you can scroll all the way to the bottom of this page for some mock ups and coloring page.
REQUIREMENTS:
- Fabrics: 5 fat Quarters
- Rotary Cutter
- Ruler at least a 6 x 24”
- Cardboard for template if necessary
- Cutting mat
- Spray Starch
- Pins
- Scissors
CUTTING CHART:
Important Note: Due to the irregular shapes involved in this design and the softness of the fabric, I recommend diligently starching and ironing your fat quarters before cutting to keep the biased edges fairly stable for piecing. Do not tug while piecing and handle cut pieces with care.
Refer to the illustration below for how to cut the diamonds and parallelograms used in this block from strips using the 60° angle of your ruler.
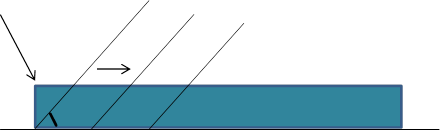
Note: 60° angle aligns with the bottom of strip set as indicated by the extended black line such that your 60° marking is angled as indicated by the curve in the diagram above. After trimming the excess continue moving your ruler so that the new cut edge of your fabric is X distance (X = desired length of diamond e.g. 2.25 or 4” as needed for this block indicated by the small arrow) away from the vertical edge of your ruler with the 60° angle still aligned with the bottom of the strip as shown above.

The block is pieced in 2 sets which I’ve called set A and B as shown in the image below:

Piecing set A:
Note – Sew all seams with an accurate 1/4″ seam allowance. To find out more about piecing your quilt read The Quilting Process: Piecing your Quilt Top
Step 1: Sew your 2.25 x 18” strips together staggering your strips by 2” at least to minimize wastage and then sew your 2.5” strip to your pieced set to complete your set A.
Step 2: Press both seam allowances away from the center
Step 3: Lay your ruler along the edge of your strip set, making sure the 60° line of your ruler is aligned with the bottom edge of your strip and the end of the ruler is at the corner of the strip. (Refer to the diamond cutting diagram above)
Step 4: Cut off the excess fabric at the beginning of the strip then you are ready to make the first cut. For your first cut, rotate your ruler as indicated below to cut out your 6.5” triangle, continue rotating until you get to the end of your strip set, you will have left overs which can be used to make a different color way of this block or saved for a later project. What you need is the triangle with the sky fabric at the top represented by A and C as illustrated below.

Piecing set B:
Step 1: Repeat steps 1 and 2 for piecing set A as stated above to sew together your 2.25” strips for set B
Step 2: Repeat step 3 as above

Step 3: (Refer to this diagram showing steps 3 and 4) It is a modified version of the diamond cutting illustration. (Trim off the excess, move your ruler such that the vertical line of your ruler measures 2.25″ then make the first cut. You only need to cut 2 parallelograms facing this direction).
Step 4: To cut the parallelogram facing the other direction, flip over the remaining strip such that the seam allowance is now facing upward, then repeat step 3 and 4 as before to cut 2 more 2.25” parallelogram. In all you need (4) 2.25 x 4”sets for set B You should end up with 4 pieces that look like this:
Step 5: sew one of the 2.25 diamond from fabric B to a 2.25” parallelogram (make 2)
 Note: Unlike your regular square piecing where you align the pieces edge to edge, for piecing diamonds, you want to align your ¼” seam allowances – that means moving the edge of the top piece to ¼” away from the edge of the bottom piece then sew together as illustrated.
Step 6: Sew the remaining parallelogram to the 4” diamond from fabric D (make 2) sew one to the top right and another to the bottom left with the Iris (darker fabric) facing inward
Step 7: sew the sets from step 5 and 6 above together to make a bigger diamond called set B above (make 2)
Piecing Block:

The Illustration above covers steps 1 to 4 below:
Step 1: At this point you should have (2) 6.5” equilateral triangles and (2) 6.5” diamonds, sew the triangle and the diamond together into a half hexagon (make 2).
Step 2: sew the two half hexagons together to make one big hexagon. Piecing of the center block is now complete!!! The Hexagon finishes at 12.5 x 11” at this point.
Step 3: sew your corner triangles to the hexagon as shown below to transform your Hexagon into a 12.5 x 11” Rectangle
Step 4: Sew (1) 1.25 x 12.5” strip to the top and bottom of the rectangle from step 3 to square your block.
Step 5: Square up your block by trimming off any excess, making sure your block ends up as a 12.5” unfinished block for a 12” finish
Finally, Rotate block as preferred…Congratulations you have now completed this process!


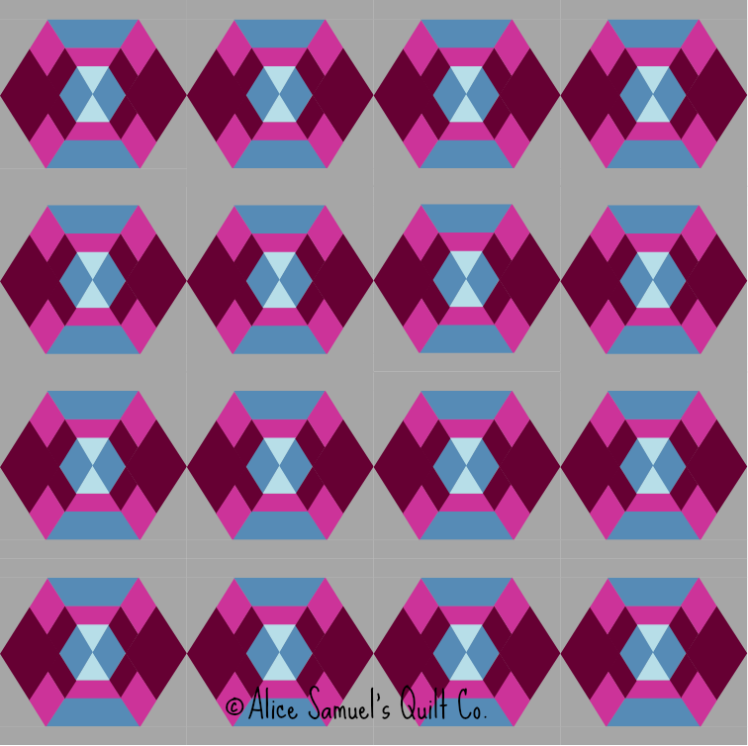
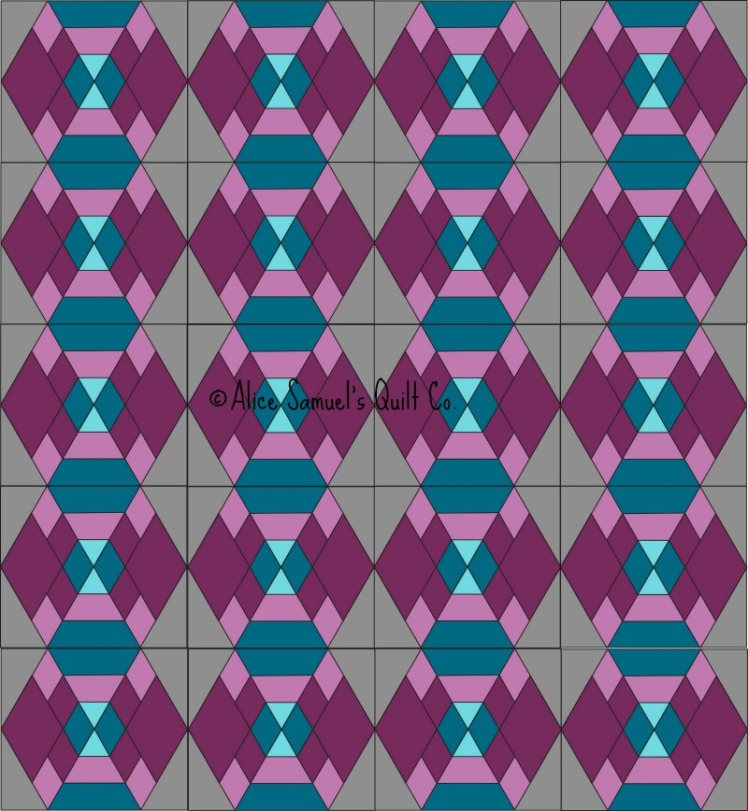
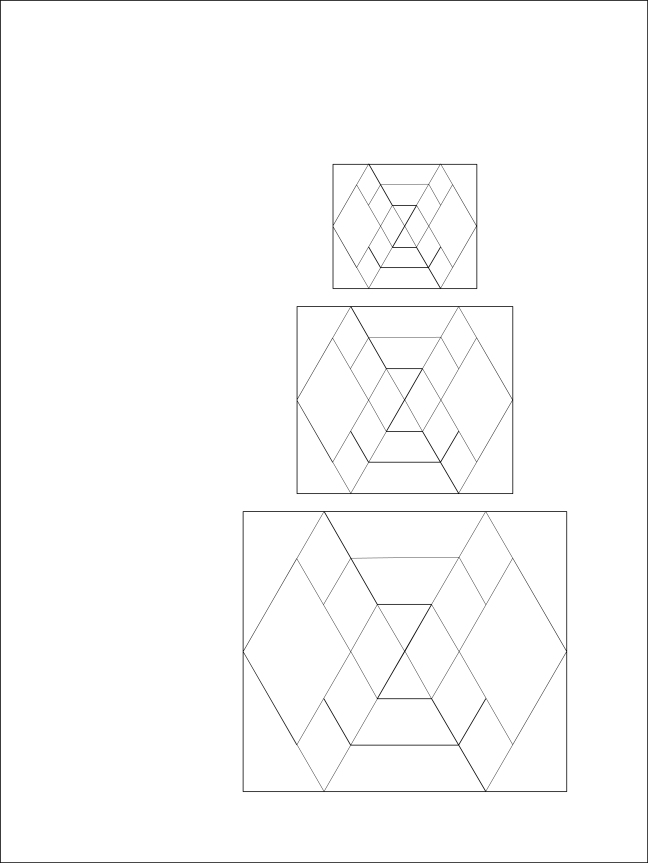
Here’s a sample Quilt layout, more in the PDF tutorial with free coloring pages and you can scroll to the end of this post for more. By the way I made 5 test blocks in different palettes but this post is way too long I’ll have to share them some other times.
I hope you love this block as much as I do and will enjoy making it in various color ways. If you do make this block then I’d love to see what you make with it. If you are on Instagram then tag me @alicesamuelsquiltco or use #diamondfusionquiltblock in your post or send me an email alicesamuelsquiltco@gmail.com. If you were to name this block what name would you have gone for, also, what piecing technique would you have preferred? I’d love your opinion!
If you’ve been following the blog hop from Monday then I’m sure you’ve encountered so many amazing talents and gorgeous blocks, I sure have been blown away but before you pack it in, be sure to visit other talented Quilters on the hop today, simply follow link below: The host Stephanie of @Late Night Quilter
Kathy @Kathys Kwilts and More
Paige @Quilted Blooms
Mary @Strip Quilts Pass it On
Allison @Woodberry Way
Seven @The Concerned Craft
Olusola @Alice Samuel’s Quilt Co. That’s me 🙂
Ann @Brown Paws Quilting
Jodie @Persimmon + Pear
Vicki @Orchid Owl Quilts
Kitty @Night Quilter
Francine @Mochawildchild
Shelley @The Carpenter’s Daughter who Quilts
Jayne @Twiggy and Opal
Geraldine @Living Water Quilter
Shannon @Shannon Fraser Designs
Lisa @Sunlight In Winter Quilts
Jessica @Quilty Habit
Cassandra @The (not so) Dramatic Life
Deanna @Stitches Quilting
Denise @Craft Traditions
As always, thanks for stopping by,your comments make me so happy so thanks in advance and do enjoy the rest of the week.
Sola 🙂
P.S: It’s past 2 a.m. my time as I put the final touches to this post so fingers cross that it goes out as scheduled otherwise it’ll when I get up in a few hours time!


What a beautiful block! Diamond shapes aren’t usually my thing, but you have such a clear tutorial that I might give it a go! Thanks so much.
LikeLike
Hi Jennifer, thanks for your lovely comment! I would be happy to see what you make with it, so I really hope you give it a go! 🙂
LikeLike
Wow, Sola! Your block is beautiful, and your tutorial is great.
LikeLike
I am so glad Jennifer, thanks a lot! 🙂
LikeLiked by 1 person
Fabulous! I love it. The tutorial is well done
LikeLike